I want to look at how to get a very simple PHP project setup in Jenkins using the standard suite of tools and templates as demonstrated on php-jenkins.org.
If you do not have Jenkins installed or are not sure you have your environment setup correctly, please checkout my previous tutorial Getting Started With Jenkins for PHP.
A quick checklist
Before we start, make sure you have your environment and Jenkins installation up and running and appropriately configured.
- You have a JVM and Jenkins installed running at http://localhost:8080
- You have the following Jenkins plugins installed
- checkstyle
- cloverphp
- dry
- htmlpublisher
- jdepend
- plot
- pmd
- violations
- xunit
- You have the following PEAR packages installed
- pdepend/PHP_Depend
- phpmd/PHP_PMD
- phpunit/phpcpd
- phpunit/phploc
- PHPDocumentor
- PHP_CodeSniffer
- phpunit/PHP_CodeBrowser
- phpunit/PHPUnit
- phpunit/ppw
- You have Ant installed
- You have Git installed and are familiar with its basic use
- You have the Zend_Framework installed globally as a PEAR package
If you don't have the above installed please refer to the Getting Started With Jenkins for PHP tutorial.
If you're not familar with Git, have a quick read of git-scm.org or refer to my Git cheatsheet.
To install the Zend Framework as a PEAR package see my post on Installing Zend Framework from PEAR.
Create your project
I'm basing this tutorial on a sample Zend Freamework application, you're free to use whatever codebase you like. But for the purposes of this tutorial I'm using this project as a starting point: [email protected]:ajbonner/Bookings.git.
$ git clone https://github.com/ajbonner/Bookings.git ./bookings
  $ cd bookings
  $ ppw --name 'Bookings' --source ./application .
This will generate an ant build file with some general defaults for PHP_CodeSniffer and PHP Mess Detector along with a standard phpunit configuration file.
First thing, we'll need to make a small amendment to the phpunit configuration file, since we're testing a Zend Framework application, we need to make sure PHPUnit loads a custom bootstrap before running tests. Open up the generated phpunit.xml.dist file and change the opening phpunit element to look like this:
<phpunit backupGlobals="false"
                backupStaticAttributes="false"
                strict="true"
                verbose="true"
                colors="true"
                bootstrap="tests/bootstrap.php">
Our build environment is now configured correctly to run Zend Framework Test Cases, we have our ant build file setup and some defaults configured for our code coverage and analysis tools. Let's add our new build and phpunit configuration files to git and commit our changes. Then we can run ant and see what happens.
$ git add build.xml phpunit.xml.dist
  $ git commit -m 'Add build and test configuration files'
  $ ant
  >> Buildfile: /home/aaron/Sites/Bookings/build.xml
  >> clean:
  >>    [delete] Deleting directory /home/aaron/Sites/Bookings/build/api
  >>    [delete] Deleting directory /home/aaron/Sites/Bookings/build/code-browser
  >>    [delete] Deleting directory /home/aaron/Sites/Bookings/build/coverage
  >>    [delete] Deleting directory /home/aaron/Sites/Bookings/build/logs
  >>    [delete] Deleting directory /home/aaron/Sites/Bookings/build/pdepend
  >>     [mkdir] Created dir: /home/aaron/Sites/Bookings/build/api
  >>     [mkdir] Created dir: /home/aaron/Sites/Bookings/build/code-browser
  >>     [mkdir] Created dir: /home/aaron/Sites/Bookings/build/coverage
  >>     [mkdir] Created dir: /home/aaron/Sites/Bookings/build/logs
  >>     [mkdir] Created dir: /home/aaron/Sites/Bookings/build/pdepend
  >>
  >> parallelTasks:
  >>
  >> phpcpd:
  >>
  >> pdepend:
  >>      [exec] PHP_Depend 0.10.5 by Manuel Pichler
  >>      [exec]
  >>      [exec] Parsing source files:
  >>      [exec] ....                                                             4
  >>      [exec]
  >>      [exec] Executing Coupling-Analyzer:
  >>      [exec]                                                                 18
  >>      [exec]
  >>      [exec] Executing CyclomaticComplexity-Analyzer:
  >>      [exec] .                                                               24
  >>      [exec]
  >>      [exec] Executing Dependency-Analyzer:
  >>      [exec]                                                                 17
  >>      [exec]
  >>      [exec] Executing Inheritance-Analyzer:
  >>      [exec]                                                                  5
  >>      [exec]
  >>      [exec] Executing NodeCount-Analyzer:
  >>      [exec]                                                                 14
  >>      [exec]
  >>      [exec] Executing NodeLoc-Analyzer:
  >>      [exec] phpcpd 1.3.2 by Sebastian Bergmann.
  >>      [exec]
  >>      [exec] 0.00% duplicated lines out of 119 total lines of code.
  >>      [exec]
  >>      [exec] Time: 0 seconds, Memory: 2.75Mb
  >>      [exec] .                                                               22
  >>      [exec]
  >>      [exec] Generating pdepend log files, this may take a moment.
  >>      [exec]
  >>      [exec] Time: 00:00; Memory: 9.50Mb
  >>
  >> phpcs:
  >>
  >> phpmd:
  >>      [exec] Result: 1
  >>
  >> phploc:
  >>      [exec] phploc 1.6.1 by Sebastian Bergmann.
  >>      [exec]
  >>      [exec] Directories:                                          1
  >>      [exec] Files:                                                4
  >>      [exec]
  >>      [exec] Lines of Code (LOC):                                119
  >>      [exec]   Cyclomatic Complexity / Lines of Code:           0.08
  >>      [exec] Comment Lines of Code (CLOC):                        18
  >>      [exec] Non-Comment Lines of Code (NCLOC):                  101
  >>      [exec]
  >>      [exec] Namespaces:                                           0
  >>      [exec] Interfaces:                                           0
  >>      [exec] Classes:                                              4
  >>      [exec]   Abstract:                                           0 (0.00%)
  >>      [exec]   Concrete:                                           4 (100.00%)
  >>      [exec]   Average Class Length (NCLOC):                      22
  >>      [exec] Methods:                                              9
  >>      [exec]   Scope:
  >>      [exec]     Non-Static:                                       9 (100.00%)
  >>      [exec]     Static:                                           0 (0.00%)
  >>      [exec]   Visibility:
  >>      [exec]     Public:                                           8 (88.89%)
  >>      [exec]     Non-Public:                                       1 (11.11%)
  >>      [exec]   Average Method Length (NCLOC):                     10
  >>      [exec]   Cyclomatic Complexity / Number of Methods:       1.89
  >>      [exec]
  >>      [exec] Anonymous Functions:                                  0
  >>      [exec] Functions:                                            0
  >>      [exec]
  >>      [exec] Constants:                                            0
  >>      [exec]   Global constants:                                   0
  >>      [exec]   Class constants:                                    0
  >>
  >> phpunit:
  >>      [exec] PHPUnit 3.5.14 by Sebastian Bergmann.
  >>      [exec]
  >>      [exec] ...
  >>      [exec] .
  >>      [exec]
  >>      [exec] Time: 1 second, Memory: 19.25Mb
  >>      [exec]
  >>             OK (4 tests, 16 assertions)
  >>
  >>      [exec] Writing code coverage data to XML file, this may take a moment.
  >>      [exec]
  >>      [exec] Generating code coverage report, this may take a moment.
  >>
  >> phpcb:
  >>
  >> build:
  >>
  >> BUILD SUCCESSFUL
  >> Total time: 3 seconds
  >>
If you have everything setup correctly you will have a build directory with a number of artifacts: code coverage analysis, code style reports, dependency analysis, etc. You can look at these directly but it's much more convienient to use Jenkins to view these artifacts.
Importing a Project into Jenkins
We have a working build and we are producing a number of artifacts representing certain aspects of our software. Time now to import the project into Jenkins and have this process ran automatically.
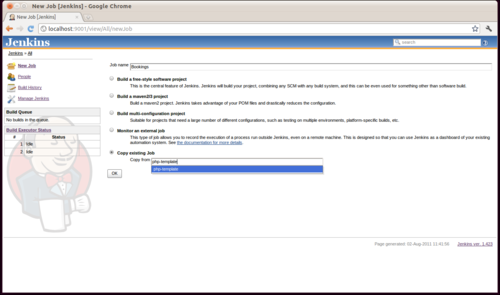
Step 1 - Create a New Jenkins Project
As part of getting our environment ready for Jenkins, we installed a PHP Project Template. To create our new Project, we copy this template, and give our project a name. Choose whatever you like, but for the purposes of this tutorial, I've chosen 'Bookings'.
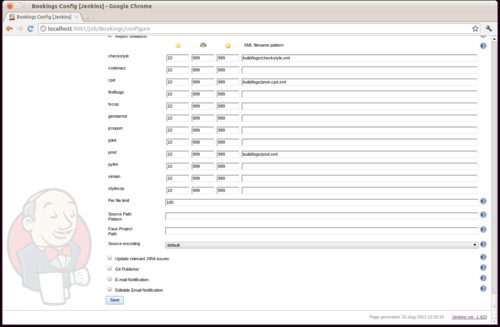
Step 2 - Configure your New Project
You're now presented with a (at first glance) daunting configuration page. We'll work our way down the page, for the most part we don't need to make major changes.
Firstly the pdepend task generates a pair of SVG images, in order to have these display on the project dashboard we need to substitute 'job-name' to 'Bookings' (or whatever you chose for your project name) in the embed tags in the description field.
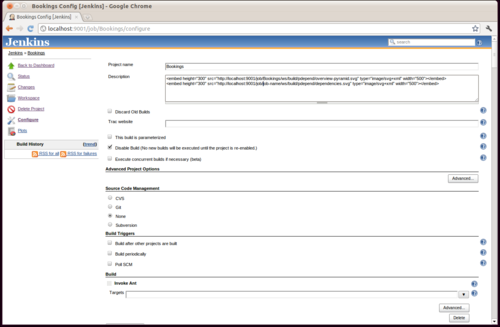
Next, uncheck 'disable build', naturally we want to perform builds!
The project will be retrieved from the git repository we created during the initial build configuration. Pass in the absolute filesystem path to your repository, for example mine is file:///home/aaron/Sites/Bookings.
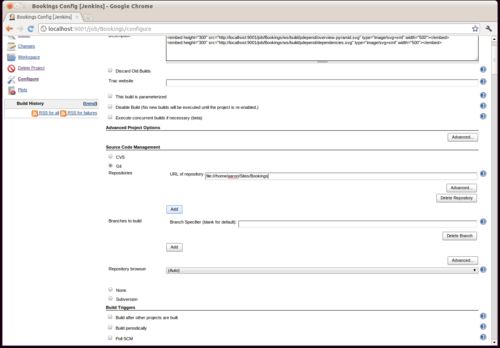
That's it. You now have setup the project in Jenkins and defined a source. The remaining details can be left at their defaults. Scroll down to the bottom of the page and click the save button.
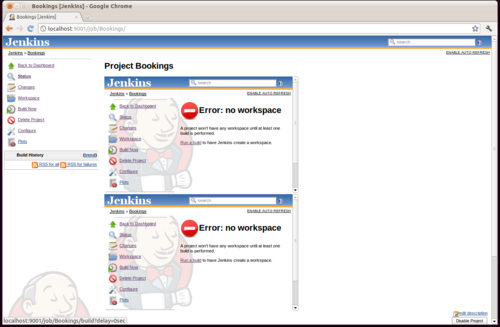
Step 3 - Build the Project
The project needs to first do a build before the project workspace can be initialised. On the left hand project menu is a 'build now' link. Click that and Jenkins will checkout a copy of our project from git then process the ant build.xml we defined.
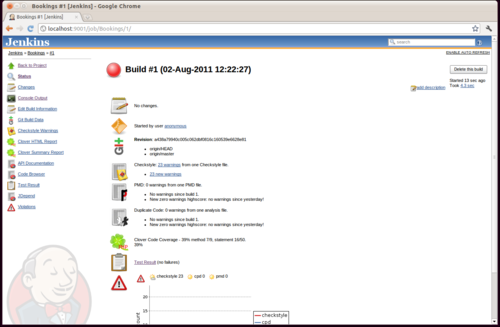
Once the build is complete you can click on the build and take in all the dianostic and code analysis artifacts generated during the build.
Possibly, you may run into an issue building your project from git. A common cause is Jenkins being unable to find a user identity for its operating system user. Please see my post Cannot Build Git Project in Jenkins if this happens to you.
What Next?
Continuous integration isn't about pretty graphs and pithy build summaries. It's about maintaining working software and highlighting issues as soon as possible. Jenkins has a wealth of plugins that help this process, but perhaps the first one to checkout is the email functionality, letting your development team know immediately if something is broken.